av-en-pipe 172 / 199
10秒後にBOOKのページに移動します
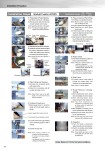
170 Installation Steps Socket Fusion AV225 ④ Fixing and Cleaning of Pipe & Fittings 1) Fix fitting at a specified location. Notes: Match cushion rubber corner part and fitting step part. 2) Fix pipe in alignment with thrust gauge line. Notes: Check that it is within gauge control width. 3) Forward pipe close to fitting and check the alignment of pipe shaft. (Up/down and right/left) 4) Clean the pipe cut surface and the internal face of fitting socket with a special paper towel fully impregnated with acetone. ① Preparation of Fusion Machine 1) Set fusion machine on a flat place. 2) Wire the power cable from the main unit and hydraulic unit to heater. 3) Fix heater face and turn on the power. Notes:・ No biting of foreign objects. ・ Tighten firmly without looseness. 4) Install fusion-size liner (pipe liner, fitting liner). 5) Operate the unit lever forward and adjust the pressure adjustment selector to 5 MPa while making clamp touching and checking the pressure gauge. Notes: Check that the filter regulator is fully closed. ② Pipe Cutting and Cleaning 1) Cut pipe at a necessary length with a pipe cutter. 2) Check for no scratches and dirt on pipe and clean, if any. Notes: Check that it was cut at rightangle. Cut and remove any harmful scratches. ③ Cutting of Fused Face 1) Mark gauge lines for insertion length and thrust length using a gauge. 2) Cut the surface from pipe leading end to insertion gauge line with a scraper. 3) Chamfer the pipe end. Notes:・ After cutting, check for no scratches on the fused surface. ・ If some uncut areas remain, cut again. ・ Use special tools for surface cutting and chamfering. ⑤ Heater Check 1) Check that the temperature is 260±10「ェC using a surface thermometer. Notes:・ Measure at several locations and check for no fluctuation. ・ If the temperature is out of the specified range, adjust with the temperature selector. 2) Clean the heater face surface. Check no dirt and then set at a specified location. ⑥ Heat Fusion 1) Forward clamp, insert pipe & fittings into heater face, and heat/fuse for the specified time. Notes: Insert at a certain speed. ⑦ Heater Removal, Crimping, Cooling 1) After completing heat fusion, retract clamp immediately and remove heater. 2) After removing heater, move clamp forward to the stroke end. Notes: Time from completion to completion of crimping shall be done within the specified conversion time. 3) After completion of crimping, cool it for the specified time while clamped. 4) Remove from clamp and cool it for the specified time. Notes: Do not apply any load on the fused part until completely cooled. Main Power Source Heater Power Source Temperature Adjustment Selector (Forward) Pressure Gauge Selector Pressure Gauge Filter Regulator (Backward) Insertion length (Pipe insertion amount) Thrust length (Clamp installation position) (Fitting fixing) (Pipe fixing) ⑧ Inspection 1) Check that bead is consistently applied along the entire circumference. 2) Check for no scratches, abnormalities, etc. on the connected part. Notes: If any defects are seen, cut the connected part and redo from the beginning. Notes: Refer to P.172 for the fusion conditions. Applicable Range 125 . 200 mm (d140 . d225) Installation Procedure