av-en-pipe 59 / 199
10秒後にBOOKのページに移動します
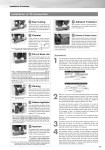
057 Installation Procedure Installation of TS Connection Use wide thick paper or tape for the pipe cutting area, put a cutting gauge line with a permanent marker on the entire circumference, and cut perpendicular to the pipe shaft. 1 Pipe Cutting After connection, wipe the protruded adhesive immediately and do not apply forcible stress on the connection part. 7 Adhesive Treatment TS connection utilizes the swelling and elasticity of PVC by making the fitting socket tapered and using adhesive. Applying adhesive to the pipe and fitting would create a swelling layer of approximately 0.1 mm thickness on its surface as shown (Figure 1), and this layer makes the insertion of the pipe fluidly. After insertion, respective swelling layers of the pipe and fitting would interact each other, and the bonding surface would be unified. Based on a result of testing the relationship between the bonding margin length and pressure-resistant strength, it has been confirmed that practically acceptable water pressure strength can be secured by inserting approximately 1/3 of the fitting socket [R] in addition to the insertion length without applying adhesive (zero point). In regards to insertion margin in TS connection, it is ideal to insert TS fitting to the length of TS fitting gasket (stopper), but considering the tolerance of pipe and fitting dimensions, the length from zero point plus the bonding margin length shown in Table 2 to the stopper in Table 1 is sufficient enough, and inserting to the stopper of the fitting is not necessarily required. However, if it cannot be inserted due to the adhesive being dried,etc., cut the connection part and reconnect again by using a new socket. Inserting the pipe into the fitting before applying adhesive is to check the zero point. In this case, a combination of pipe and fitting that provide the insertion length of 1/3 to 2/3R from the pipe end surface (refer to Figure 2) is standard. Be cautious of excessive adhesive (it may cause solvent cracking and damage). Caution is needed in low-temperature installation because solvent steam does not evaporate easily and tends to remain (it may cause solvent cracking and damage). During curing after piping, open both ends of pipe without enclosing and remove the solvent steam. During curing, the steam can be removed more effectively by ventilating inside piping using a ventilator (low-pressure specification) or washing inside piping by filling the water fully after the adhesive is hardened. [Explanation] 1 2 3 4 Lubrication layer from adhesive (0.1 mm) Zero point (a point where pipe outer diameter and socket inner diameter match) Flux Thrust Stopper Stopper Maximum Tightening Margin Zero point Gauge Line Pipe TS Fitting Insertion Length Socket LengthR Thrust Length Figure 1. Installation of TS Connection Figure 2. Zero Point and Tightening Margin Insertion After applying adhesive, insert pipe into fitting straight without turning the pipe immediately at once and press it in that condition. Refer to Table 4 for this normal press time. 6 * Use an inserter for large diameters. Table 4. Normal Press Time of TS Connection Size (mm) 50 or less 65 or more Normal Press Time (Sec.) 30 or more 60 or more Notes: Due to the relationship of pipe and fitting dimension tolerance, it may not be inserted all the way to the end. In this case, do not insert it forcibly by hammering and such. Inserting forcibly may place a large burden on the fitting and cause damage. Chamfer Lightly chamfer the entire inner/outer perimeters using a tool such as file or chamfer. When a pipe is cut, especially, finish the pipe end surface without burrs and warping. 2 90° 45° 1/2t t Notes: Not properly performing chamfering could cause installation failure so please make sure to chamfer. Entry of Gause Line For the pipe insertion gauge line of the sizes 13 to 40 mm, measure the fitting socket length R from the pipe end and mark on the pipe body with a marker. For the pipe insertion gauge line for the sizes 50 to 150 mm, it shall be at a position of the zero point plus the bonding margin length in Table 2. Mark the gauge line on the pipe body with a permanent marker. 3 Table 1. TS Fitting Socket Normal Length Unit: mm Size 13 16 20 25 30 40 50 65 75 100 125 150 Fitting Socket Length 26 30 35 40 44 55 63 61 64 84 104 132 [Reference] Table 2. Bonding Margin Length Unit: mm Size 13 16 20 25 30 40 50 65 75 100 125 150 Bonding Margin Length 10 10 15 15 15 20 20 20 25 30 35 45 * Refer to [Explanation] 2. Rinsing Wipe and clean the inner face of fitting socket and the outer face of pipe insertion port with a cloth. In particular, when oil or water is on the connection part, clean by using a small amount of acetone and alcohol. 4 Notes: Not properly performing rinsing could cause installation failure so please make sure to rinse. Adhesive Application Use a special adhesive compatible to the type of pipe and apply it evenly in the order of on the inner face of fitting and the outer face of pipe. In particular, apply thinly and evenly to the inner face of fitting. The reference ratio of adhesive application is 7 to 3 for pipe and fitting. 5 Table 3. Usage of Adhesive per Connection Part (Reference) Size (mm) 13 16 (15) 20 25 30 (32) 40 50 65 75 100 125 150 Usage (g) 0.9 1.2 1.7 2.0 3.1 5.0 7.1 9.9 12 20 30 44 * Refer to [Explanation] 4. Adhesive contains organic solvent, and the solvent steam needs to be removed after connection. During curing after piping, open both ends of pipe without enclosing and remove the solvent steam. During curing, the steam can be removed more effectively by ventilating inside piping using a ventilator (low-pressure specification) or washing inside piping by filling the water after the adhesive is hardened. 8 Removal of Solvent Content * Refer to [Explanation] 4. Gauge Line